|
查看ubuntu版本:lsb_release -a、cat /etc/os-release
安装ifconfig命令:apt-get install net-tools
安装ping命令:apt-get install iputils-ping
安装ip命令:apt-get install iproute2
安装Tab键实例插件:apt-get install bash-completion
取消最小化:/usr/local/sbin/unminimize
一、卸载不必要的软件
卸载LibreOffice
sudo apt-get remove libreoffice-common
卸载Amazon的链接
apt-get purge unity-webapps-common
卸载一些预装软件
apt-get purge thunderbird totem rhythmbox empathy brasero simple-scan gnome-mahjongg aisleriot gnome-mines cheese transmission-common gnome-orca webbrowser-app gnome-sudoku landscape-client-ui-install
apt-get purge onboard deja-dup
删除Amazon广告图标
sudo rm -f /usr/share/applications/com.canonical.launcher.amazon.desktop
sudo rm -f /usr/share/applications/ubuntu-amazon-default.desktop
其他软件
sudo apt-get -y purge thunderbird* #邮件
sudo apt-get -y purge firefox #火狐浏览器
sudo apt-get -y purge deja-dup #备份
sudo apt-get -y purge simple-scan #扫描
sudo apt-get -y purge hplip* #打印
sudo apt-get -y purge printer-driver* #打印驱动
sudo apt-get -y purge rhythmbox* #音乐播放
sudo apt-get -y purge gedit* #文本编辑
sudo apt-get -y purge libreoffice* #办公套件
sudo apt-get -y purge gnome-orca #屏幕阅读
sudo apt-get -y purge onboard #屏幕键盘
sudo apt-get -y purge mahjongg #对对碰
sudo apt-get -y purge aisleriot #纸牌王
sudo apt-get -y purge gnome-sudoku #数独
sudo apt-get -y purge gnomine #扫雷
sudo apt-get -y purge wodim #命令刻碟
导航栏放在底部
gsettings set com.canonical.Unity.Launcher launcher-position Bottom
二、切换SHELL
1、查看当前发行版可以使用的shell
root@Ubuntu:~# cat /etc/shells
# /etc/shells: valid login shells
/bin/sh
/bin/bash
/usr/bin/bash
/bin/rbash
/usr/bin/rbash
/bin/dash
/usr/bin/dash
2、查看当前使用的shell,最常用的查看shell的命令,但不能实时反映当前shell
root@Ubuntu:~# echo $SHELL
3、环境变量中shell的匹配查找
root@Ubuntu:~# env | grep SHELL
SHELL=/bin/bash
4、切换dash为bash
sudo dpkg-reconfigure dash
三、ubuntu 保存防火墙命令,iptables方式:
1、iptables 配置好策略
2、iptables-save > /etc/network/iptables.up.rules ,配置的策略保存到文件
3、iptables-apply,然后按 y 或者 iptables-restore < /etc/network/iptables.up.rules
四、更换apt源
 ![]()
编辑/etc/apt/sources.list文件, 在文件最前面添加以下条目(操作前请做好相应备份),保存退出后使用sudo apt-get update && sudo apt-get upgrade更新源

# 阿里源
deb http://mirrors.aliyun.com/ubuntu/ focal main restricted universe multiverse
deb-src http://mirrors.aliyun.com/ubuntu/ focal main restricted universe multiverse
deb http://mirrors.aliyun.com/ubuntu/ focal-security main restricted universe multiverse
deb-src http://mirrors.aliyun.com/ubuntu/ focal-security main restricted universe multiverse
deb http://mirrors.aliyun.com/ubuntu/ focal-updates main restricted universe multiverse
deb-src http://mirrors.aliyun.com/ubuntu/ focal-updates main restricted universe multiverse
deb http://mirrors.aliyun.com/ubuntu/ focal-proposed main restricted universe multiverse
deb-src http://mirrors.aliyun.com/ubuntu/ focal-proposed main restricted universe multiverse
deb http://mirrors.aliyun.com/ubuntu/ focal-backports main restricted universe multiverse
deb-src http://mirrors.aliyun.com/ubuntu/ focal-backports main restricted universe multiverse

# 华为源地址
deb https://repo.huaweicloud.com/ubuntu/ focal main restricted
deb https://repo.huaweicloud.com/ubuntu/ focal-updates main restricted
deb https://repo.huaweicloud.com/ubuntu/ focal universe
deb https://repo.huaweicloud.com/ubuntu/ focal-updates universe
deb https://repo.huaweicloud.com/ubuntu/ focal-backports main restricted universe
deb https://repo.huaweicloud.com/ubuntu/ focal-security main restricted
deb https://repo.huaweicloud.com/ubuntu/ focal-security universe

# 网易163源
deb http://mirrors.163.com/ubuntu/ focal main restricted universe multiverse
deb http://mirrors.163.com/ubuntu/ focal-security main restricted universe multiverse
deb http://mirrors.163.com/ubuntu/ focal-updates main restricted universe multiverse
deb http://mirrors.163.com/ubuntu/ focal-proposed main restricted universe multiverse
deb http://mirrors.163.com/ubuntu/ focal-backports main restricted universe multiverse
deb-src http://mirrors.163.com/ubuntu/ focal main restricted universe multiverse
deb-src http://mirrors.163.com/ubuntu/ focal-security main restricted universe multiverse
deb-src http://mirrors.163.com/ubuntu/ focal-updates main restricted universe multiverse
deb-src http://mirrors.163.com/ubuntu/ focal-proposed main restricted universe multiverse
deb-src http://mirrors.163.com/ubuntu/ focal-backports main restricted universe multiverse

# 中科大源
deb https://mirrors.ustc.edu.cn/ubuntu/ focal main restricted universe multiverse
deb-src https://mirrors.ustc.edu.cn/ubuntu/ focal main restricted universe multiverse
deb https://mirrors.ustc.edu.cn/ubuntu/ focal-updates main restricted universe multiverse
deb-src https://mirrors.ustc.edu.cn/ubuntu/ focal-updates main restricted universe multiverse
deb https://mirrors.ustc.edu.cn/ubuntu/ focal-backports main restricted universe multiverse
deb-src https://mirrors.ustc.edu.cn/ubuntu/ focal-backports main restricted universe multiverse
deb https://mirrors.ustc.edu.cn/ubuntu/ focal-security main restricted universe multiverse
deb-src https://mirrors.ustc.edu.cn/ubuntu/ focal-security main restricted universe multiverse
deb https://mirrors.ustc.edu.cn/ubuntu/ focal-proposed main restricted universe multiverse
deb-src https://mirrors.ustc.edu.cn/ubuntu/ focal-proposed main restricted universe multiverse

# 清华源
deb https://mirrors.tuna.tsinghua.edu.cn/ubuntu/ eoan main restricted universe multiverse
deb-src https://mirrors.tuna.tsinghua.edu.cn/ubuntu/ eoan main restricted universe multiverse
deb https://mirrors.tuna.tsinghua.edu.cn/ubuntu/ eoan-updates main restricted universe multiverse
deb-src https://mirrors.tuna.tsinghua.edu.cn/ubuntu/ eoan-updates main restricted universe multiverse
deb https://mirrors.tuna.tsinghua.edu.cn/ubuntu/ eoan-backports main restricted universe multiverse
deb-src https://mirrors.tuna.tsinghua.edu.cn/ubuntu/ eoan-backports main restricted universe multiverse
deb https://mirrors.tuna.tsinghua.edu.cn/ubuntu/ eoan-security main restricted universe multiverse
deb-src https://mirrors.tuna.tsinghua.edu.cn/ubuntu/ eoan-security main restricted universe multiverse
deb https://mirrors.tuna.tsinghua.edu.cn/ubuntu/ eoan-proposed main restricted universe multiverse
deb-src https://mirrors.tuna.tsinghua.edu.cn/ubuntu/ eoan-proposed main restricted universe multiverse
apt源五、ubuntu20.04设置开机自启动命令
1、创建rc.local文件并添加可执行权限chmod 755 /etc/rc.local
root@Ubuntu20:~# nano /etc/rc.local
#!/bin/bash

echo "hello world" >/var/log/hello.log
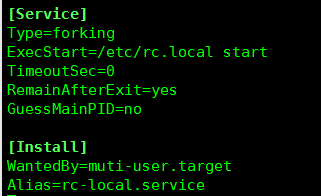
2、编辑rc-local.service文件,在文件底部添加
root@Ubuntu20:~# nano /lib/systemd/system/rc-local.service
[Install]
WantedBy=muti-user.target
Alias=rc-local.service
3、最后把rc-local.service添加到开机启动
systemctl enable rc-local.service #添加到开机启动
systemctl disable rc-local.service #关闭开机启动
六、Ubuntu修改dns地址
修改/etc/systemd/resolved.conf文件,添加dns,然后退出保存。
root@Ubuntu:~# nano /etc/systemd/resolved.conf
[Resolve]
DNS=114.114.114.114 8.8.8.8
#FallbackDNS=
#Domains=
#LLMNR=no
#MulticastDNS=no
#DNSSEC=no
#DNSOverTLS=no
#Cache=no-negative
#DNSStubListener=yes
#ReadEtcHosts=yes
root@Ubuntu:~# mv /etc/resolv.conf /etc/resolv.conf.bak
root@Ubuntu:~# ln -s /run/systemd/resolve/resolv.conf /etc/
root@Ubuntu:~# systemctl restart systemd-resolved.service #重启服务
root@Ubuntu:~# systemctl enable systemd-resolved.service #加入到开机启动
root@Ubuntu:~# systemd-resolve --status #查看dns地址是否修改成功
root@Ubuntu:~# systemctl is-enabled systemd-logind.service #查看服务是否被屏蔽(masked)
Unit systemd-logind.service is masked
解决方法:
root@Ubuntu:~# systemctl unmask systemd-logind.service
root@Ubuntu:~# systemctl enable systemd-logind.service
root@Ubuntu:~# systemctl start systemd-logind.service
root@Ubuntu:~# systemctl is-enabled systemd-logind.service #查看服务是否被屏蔽(masked)
七、服务管理脚本
![]() ![]()
#!/bin/bash
#自定义服务管理脚本

. /lib/lsb/init-functions

ps aux | grep python | awk 'NR==1{print $2}' >/var/run/fastapi.pid
PIDFILE="/var/run/fastapi.pid"

fastapi_statu () {
    local pidfile daemon name status OPTIND

    pidfile=
    OPTIND=1
    while getopts p: opt ; do
        case "$opt" in
            p)  pidfile="$OPTARG";;
        esac
    done
    shift $(($OPTIND - 1))

    if [ -n "$pidfile" ]; then
        pidfile="-p $pidfile"
    fi
    daemon="$1"
    name="$2"

    status="0"
    pidofproc $pidfile $daemon >/dev/null || status="$?"
    if [ "$status" = 0 ]; then
        return 0
    else
        return $status
    fi
}

function start() {
        fastapi_statu -p $PIDFILE 'Fastapi' 'Fastapi'
        if [[ $? == 0 ]]; then
        echo
        else
            python /root/game_be/main.py &
        fi
}

function stop() {
        fastapi_statu -p $PIDFILE 'Fastapi' 'Fastapi'
        if [[ $? == 0 ]]; then
            pkill -9 python
        else
        echo
        fi
}

case "$1" in
start)  log_daemon_msg "Starting Fastapi" "Fastapi"
    start
    ;;
stop)   log_daemon_msg "Stopping Fastapi" "Fastapi"
    stop
        ;;
restart)log_daemon_msg "Restarting Fastapi" "Fastapi"
    stop
    sleep 1
    start
        ;;
status)
    status_of_proc -p $PIDFILE 'Fastapi' 'Fastapi' && exit 0 || exit $?
        ;;
*)  log_action_msg "Usage: /etc/init.d/api {start|stop|status|restart}"
        exit 2
        ;;
esac
exit 0
View Code八、添加永久路由
root@Ubuntu:~# cat /etc/netplan/01-network-manager-all.yaml
# Let NetworkManager manage all devices on this system
network:
  version: 2
  renderer: NetworkManager
  ethernets:
    ens32:
      dhcp4: no
      addresses:
        - 192.168.150.128/24
      gateway4: 192.168.150.1
      nameservers:
        addresses: [114.114.114.114, 8.8.8.8]
      routes:
        - to: 10.10.10.0/24
          via: 192.168.150.1
        - to: 10.10.20.0/24
          via: 192.168.150.1
root@Ubuntu:~# netplan apply # 应用配置
root@Ubuntu:~# ls /usr/share/doc/netplan/examples # netplan配置示例
九、debian配置本地apt源
# 把debian镜像文件挂载到/mnt/debian12目录
mkdir -p /mnt/debian12
mount -o loop /root/iso/debian12.iso /mnt/debian12
# 配置apt使用本地ISO作为软件源
# [trusted=yes] 表示信任本地文件,不用签名验证,bookworm是debian12的代号,debian发行版目录:https://www.debian.org/releases/
# debian12软件仓库分区介绍:https://www.debian.org/releases/stable/amd64/release-notes/ch-whats-new.zh-cn.html
nano /etc/apt/sources.list
#deb cdrom:[Debian GNU/Linux 12.11.0 _Bookworm_ - Official amd64 DVD Binary-1 with firmware 20250517-09:52]/ bookworm contrib main non-free-firmware
deb [trusted=yes] file:///mnt/debian12 bookworm main contrib non-free non-free-firmware
# 更新软件包缓存
apt update
# 使用本地源安装软件包
apt-get install net-tools
十、debian磁盘扩容
# 安装parted命令
apt install -y parted
# 查看分区
root@debian:~# lsblk
NAME                  MAJ:MIN RM  SIZE RO TYPE MOUNTPOINTS
sr0                    11:0    1  482K  0 rom
vda                   254:0    0  120G  0 disk
├─vda1                254:1    0  487M  0 part /boot
├─vda2                254:2    0    1K  0 part
└─vda5                254:5    0 19.5G  0 part
  ├─debian--vg-root   253:0    0 18.6G  0 lvm  /
  └─debian--vg-swap_1 253:1    0  980M  0 lvm  [SWAP]
# 查看看当前布局和剩余空间
root@debian:~# parted /dev/vda print free
Model: Virtio Block Device (virtblk)
Disk /dev/vda: 129GB
Sector size (logical/physical): 512B/512B
Partition Table: msdos
Disk Flags:

Number  Start   End     Size    Type      File system  Flags
        1024B   1049kB  1048kB            Free Space
 1      1049kB  512MB   511MB   primary   ext2         boot
        512MB   513MB   1048kB            Free Space
 2      513MB   21.5GB  21.0GB  extended
 5      513MB   21.5GB  21.0GB  logical                lvm
        21.5GB  129GB   107GB             Free Space
# 把扩展分区2扩到磁盘末尾
parted /dev/vda resizepart 2 100%
# 把逻辑分区5扩到扩展分区末尾
parted /dev/vda resizepart 5 100%
# 如有提示要更新内核分区表,选Fix或Yes。然后让内核重新读分区表
partprobe /dev/vda
# 扩展物理卷
pvresize /dev/vda5
# 把空闲空间都加给根逻辑卷
lvextend -l +100%FREE /dev/debian-vg/root
# 若提示找不到设备,执行以下命令:
lvextend -l +100%FREE /dev/mapper/debian--vg-root
# 确认根文件系统类型:
df -hT /
Filesystem                  Type  Size  Used Avail Use% Mounted on
/dev/mapper/debian--vg-root ext4   19G  2.4G   15G  14% /
# ext4类型执行以下命令
resize2fs /dev/mapper/debian--vg-root
# 若是xfs类型执行以下命令
xfs_growfs /
# 确认扩容是否成功
df -Th /
Filesystem                  Type  Size  Used Avail Use% Mounted on
/dev/mapper/debian--vg-root ext4  117G  2.4G  110G   3% /
十一、Ubuntu配置l2tp后无法使用
有个组件有bug,就是无法连上,换一个底层组件
# 安装xl2tpd,卸载go-l2tp
apt install xl2tpd
apt purge go-l2tp
参考:https://github.com/nm-l2tp/NetworkManager-l2tp/issues/231
参考链接:
https://launchpad.net/ubuntu/+cdmirrors # ubuntu各版本下载
https://ubuntu.zero.com.ar/ubuntu-releases/ # ubuntu各版本下载
http://cdimage.debian.org/cdimage/archive/ # debian各版本下载
https://www.einval.com/~steve/software/jigdo/download/ # jigdo工具下载
https://www.cnblogs.com/itwangqiang/p/14302252.html # 修改ubuntu网卡名为eth
https://www.cnblogs.com/liuyakai/p/14715891.html # Ubuntu修改时区和设置24小时时间格式,或使用tzselect命令修改时区
https://www.cnblogs.com/kaopunotes/p/18593236 # ubuntu通过apt-get获取已安装的package的下载链接或将其下载到本地
http://www.c-nergy.be/products.html # ubuntu安装远程桌面服务
http://c-nergy.be/blog/?p=13390
https://blog.ruanbekker.com/blog/2017/12/09/unmask-a-masked-service-in-systemd # 在systemd中取消masked服务
来源:https://www.cnblogs.com/xwupiaomiao/p/11762958.html |



 發表於 2019-10-30 09:31:00