|
前言
Keepalived 作为一个高性能的集群高可用解决方案。提供了集群节点心跳检测、健康检查以及故障切换的功能。原生支持 LVS 负载均衡集群。除了原生支持的LVS + Keepalived 外,现在 Nginx + Keepalived 也比较常用。接下来,我将详细介绍 Nginx + Keepalived。
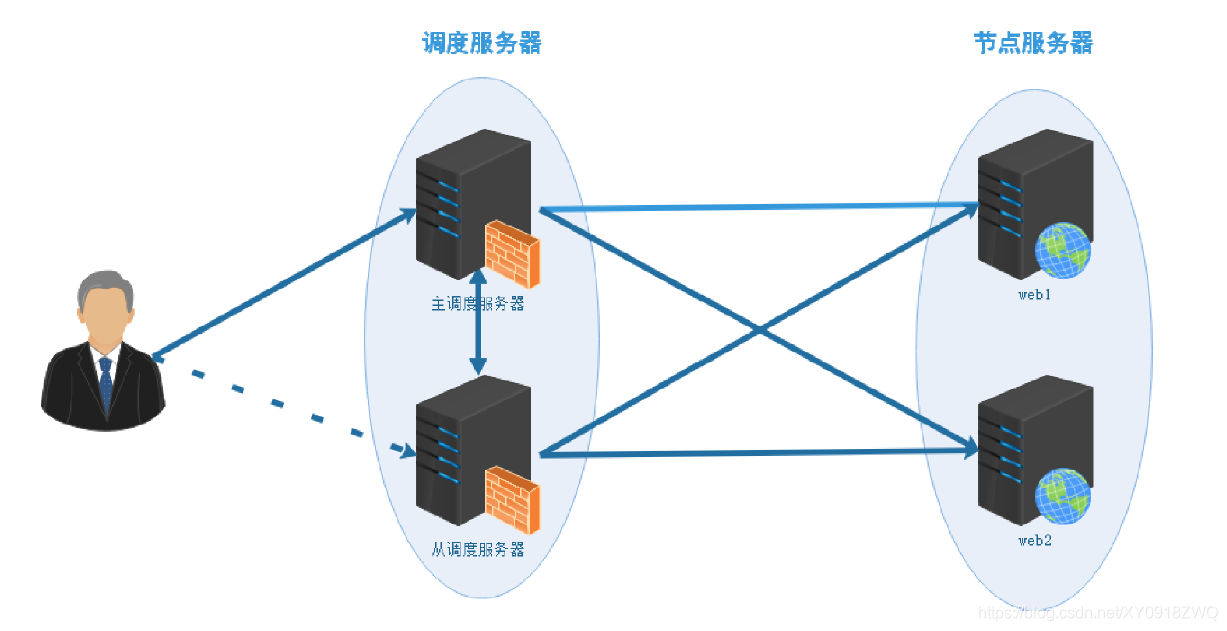
一、架构设计
负载均衡方案系统架构拓扑图
二、环境准备
| role | host | ip | software installed | OS |
|---|
| Nginx proxy、Keepalive MASTER | node01 | 192.168.5.11 | Nginx-1.10.0、keepalived | Centos 7.8 | | Nginx proxy、Keepalive BACKUP | node02 | 192.168.5.12 | Nginx-1.10.0、keepalived | Centos 7.8 | | nginx web server1 | node03 | 192.168.5.13 | Nginx-1.18.0 | Centos 7.8 | | nginx web server1 | node04 | 192.168.5.14 | Nginx-1.18.0 | Centos 7.8 | | Client | node05 | 192.168.5.15 | ---- | Centos 7.8 |
三、案例部署
配置 前端 Keepalived
---node01
[root@node01 ~]# vim /etc/keepalived/keepalived.conf
! Configuration File for keepalived

global_defs {
   notification_email {
     acassen@firewall.loc
     failover@firewall.loc
     sysadmin@firewall.loc
   }
   notification_email_from Alexandre.Cassen@firewall.loc
   smtp_server 192.168.5.10
   smtp_connect_timeout 30
   router_id LVS_DEVEL1
}
vrrp_script check_nginx_service {
   script "/etc/keepalived/check_web_server_keepalive.sh"
   #script "killall -0 nginx"
   interval 2
}

vrrp_instance VI_1 {
    state MASTER
    interface ens33
    virtual_router_id 51
    priority 200
    advert_int 1
    authentication {
        auth_type PASS
        auth_pass 1111
    }
    track_script {
       check_nginx_service
    }
    virtual_ipaddress {
        192.168.5.100
    }
}

[root@node01 ~]# systemctl restart keepalived.service


---node02
! Configuration File for keepalived

global_defs {
   notification_email {
     acassen@firewall.loc
     failover@firewall.loc
     sysadmin@firewall.loc
   }
   notification_email_from Alexandre.Cassen@firewall.loc
   smtp_server 192.168.5.10
   smtp_connect_timeout 30
   router_id LVS_DEVEL2
}
vrrp_script check_nginx_service {
   script "/etc/keepalived/check_web_server_keepalive.sh"
   #script "killall -0 nginx"
   interval 2
}

vrrp_instance VI_1 {
    state BACKUP
    interface ens33
    virtual_router_id 51
    priority 100
    advert_int 1
    authentication {
        auth_type PASS
        auth_pass 1111
    }
    track_script {
       check_nginx_service
    }
    virtual_ipaddress {
        192.168.5.100
    }
}

[root@node02 ~]# systemctl restart keepalived.service
配置 前端 Nginx 负载均衡
---node01
[root@node01 ~]# mv /etc/nginx/conf.d/default.conf{,.bak}
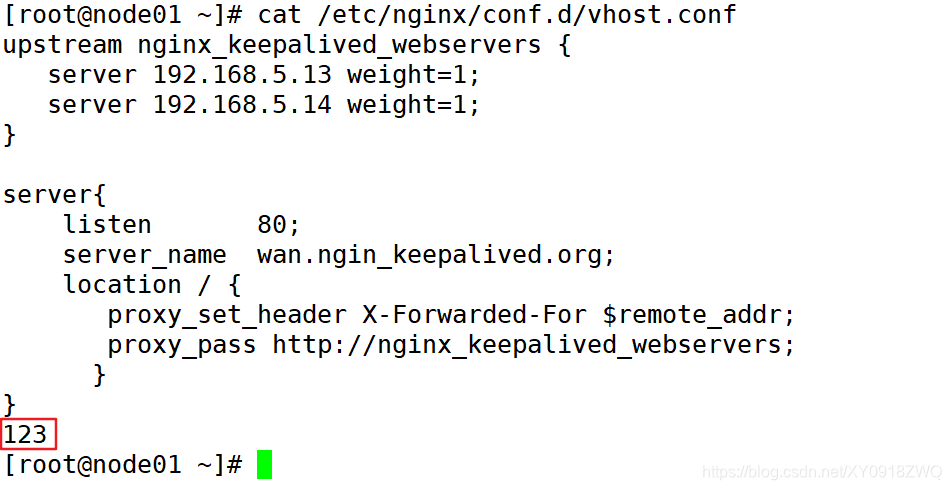
[root@node01 ~]# vim /etc/nginx/conf.d/vhost.conf
upstream nginx_keepalived_webservers {
server 192.168.5.13:80 weight=1;
server 192.168.5.14:80 weight=1;
}
server{
listen 80;
server_name wan.ngin_keepalived.org;
location / {
proxy_set_header X-Forwarded-For $remote_addr;
proxy_pass http://nginx_keepalived_webservers;
}
}
[root@node01 ~]# systemctl restart nginx
node02
[root@node02 ~]# mv /etc/nginx/conf.d/default.conf{,.bak}
[root@node02 ~]# vim /etc/nginx/conf.d/vhost.conf
upstream nginx_keepalived_webservers {
server 192.168.5.13:80 weight=1;
server 192.168.5.14:80 weight=1;
}
server{
listen 80;
server_name wan.ngin_keepalived.org;
location / {
proxy_set_header X-Forwarded-For $remote_addr;
proxy_pass http://nginx_keepalived_webservers;
}
}
[root@node02 ~]# systemctl restart nginx
配置前端 Nginx监控脚本
---node01
[root@node01 ~]# vim /etc/keepalived/check_web_server_keepalive.sh
#!/bin/bash

http_status=`ps -C nginx --no-header | wc -l`
if [ $http_status -eq 0 ];then
   systemctl start nginx
   sleep 3
   if [ `ps -C nginx --no-header | wc -l` -eq 0 ]
   then
       systemctl stop keepalived
   fi
fi


[root@node02 ~]# vim /etc/keepalived/check_web_server_keepalive.sh
#!/bin/bash

http_status=`ps -C nginx --no-header | wc -l`
if [ $http_status -eq 0 ];then
   systemctl start nginx
   sleep 3
   if [ `ps -C nginx --no-header | wc -l` -eq 0 ]
   then
       systemctl stop keepalived
   fi
fi
配置后端 web 服务
---node03
[root@node03 ~]# yum install nginx-1.18.0-1.el7.ngx.x86_64.rpm -y
[root@node03 ~]# echo "`hostname -I` web test page..." > /usr/share/nginx/html/index.html
[root@node03 ~]# systemctl enable --now nginx


----node04
[root@node04 ~]# yum install nginx-1.18.0-1.el7.ngx.x86_64.rpm -y
[root@node04 ~]# echo "`hostname -I` web test page..." > /usr/share/nginx/html/index.html
[root@node04 ~]# systemctl enable --now nginx
客户端访问 VIP
实现 Web 服务负载均衡 !
四、测试
node05 添加hosts解析
1、Keepalived 健康检查
检测 VIP 访问 Web 服务
模拟后端服务故障
[root@node04 ~]# systemctl stop nginx
[root@node04 ~]# systemctl is-active nginx
inactive
检测 VIP 访问 Web 服务
模拟后端服务故障恢复
[root@node04 ~]# systemctl start nginx
[root@node04 ~]# systemctl is-active nginx
active
检测 VIP 访问 Web 服务
注:Nginx upstream 模块默认支持对后端服务健康监测,Haproxy 同样也自带这种功能!
2、Keepalived MASTER/BACKUP 切换
查看keeapalived VIP 地址状况
node01
node02
模拟 Keepalived MASTER 故障
[root@node01 ~]# systemctl stop keepalived.service
node01
node02
web 服务访问不受影响
模拟 Keepalived MASTER 故障恢复
[root@node01 ~]# systemctl start keepalived.service
node01
node02
实现 keeapalived VIP 漂移 !
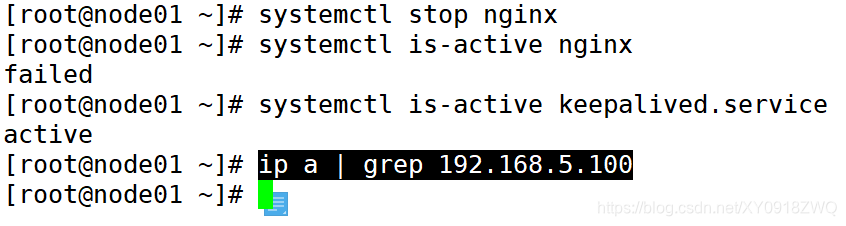
测试前端 Nginx 负载均衡服务器
node01
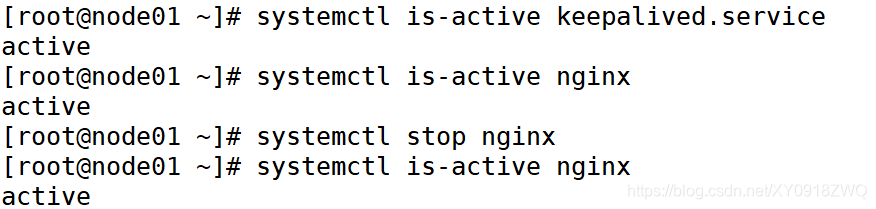
Nginx 服务异常后 自动启动!
node02
Web 访问不受影响
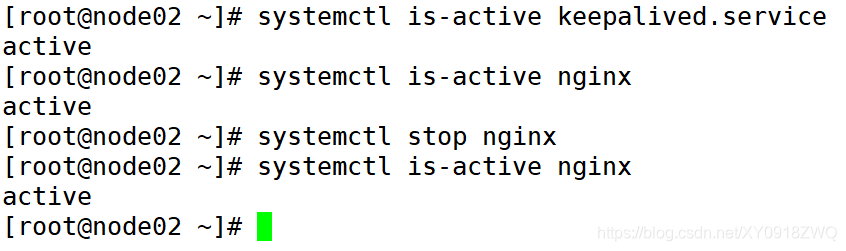
模拟node01 nginx 服务无法启动
node01
node02
Web 访问不受影响
到此这篇关于Nginx使用Keepalived部署web集群(高可用高性能负载均衡)实战案例的文章就介绍到这了,更多相关Nginx使用Keepalived部署web集群内容请搜索琼殿技术社区以前的文章或继续浏览下面的相关文章希望大家以后多多支持琼殿技术社区! |


 發表於 2025-5-17 15:27:09