|
Linux中用postfix搭建邮件服务器实战详解
postfix是Wietse Venema在IBM的GPL协议之下开发的MTA(邮件传输代理)软件。
Postfix试图更快、更容易管理、更安全,同时还与sendmail保持足够的兼容性,因此它是免费的。
postfix的产生是为了替代传统的sendmail。相较于sendmail,postfix在速度,性能和稳定性上都更胜一筹。
现在主流邮件服务都在采用postfix. 当需要一个轻量级的的邮件服务器时,postfix也是一种选择。
常见的邮件服务器软件:
sendmail:性能好,设置复杂,适合老手
qmail:体积小260+k ,模块化。需要做二次开发,适合对邮件性能有要求的
postfix:前身是sendmail,postfix原本是sendmail里面的一个模块,红帽6默认安装好postfix
zmailer:近几年才出来的邮件
coremail:国内做的最好的商业平台,运行在linux上
---------------------
Linux搭建SMTP发送邮件服务器
1.关掉sendmail相关的所有服务,最好是直接卸载sendmail.
# service sendmail stop
# chkconfig sendmail off
# rpm -qa | grep sendmail | xargs rpm -e
2.安装postfix.
查看是否安装
# rpm -qa | grep postifx
没有安装的话,可以手动安装。
# yum -y install postfix
检查mail
# rpm -qa | grep mail
如果没安装就运行该命令
# yum -y install mailx
3.安装完成后,修改配置文件:/etc/postfix/main.cfg
修改postfix配置文件
文件位置:/etc/postfix/main.cf
修改以下参数,将xxx.com换成你的域名,如果参数前面有#注释,记得去掉
myhostname = mail.xxx.com
mydomain = xxx.com
myorigin = $mydomain
inet_interfaces = all
inet_protocols = ipv4
mydestination = $myhostname, localhost.$mydomain, localhost, $mydomain
home_mailbox = Maildir/
4.修改完成后重启postifx:
# service postfix restart
---------------------
myhostname = sample.test.com ← 设置系统的主机名
mydomain = test.com ← 设置域名(我们将让此处设置将成为E-mail地址“@”后面的部分)
myorigin = $mydomain ← 将发信地址“@”后面的部分设置为域名(非系统主机名)
inet_interfaces = all ← 接受来自所有网络的请求
inet_protocols = ipv4 ← ipv4要用小写的,注释里大写的是错的
mydestination = $myhostname, localhost.$mydomain, localhost, $mydomain ← 指定发给本地邮件的域名
home_mailbox = Maildir/ ← 指定用户邮箱目录
邮箱投递方式有两种:一种是Mailbox方式,即同一个用户的所有邮件内容存储为单个文件,通常保存在/var/spool/mail/目录下文件名与用户名相同(Postfix默认使用);
第二种是Maildir方式,即使用目录结构来存储用户的邮件内容每一个用户使用一个文件夹,每封邮件都作为一个独立的文件存放。Maildir方式的存取速度和效率要好一些对于管理邮件内容页更加方便。
5.设置域名DNS
在邮件发送过程中,需要把邮件地址的domain地址转化成IP地址,再去发送给对应的收件人。(DNS中的A记录和MX记录)
如何添加DNS server?
vim /etc/resolv.conf
添加如下行:
nameserver 8.8.8.8
nameserver 8.8.4.4
上面用的8.8.8.8/8.8.4.4是Google Free DNS server,当然还有很多免费的DNS server)
有些安装后自动就添加了上面的DNS配置了,不需要再添加了
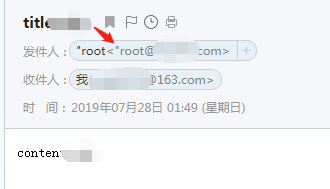
6.测试一下邮件是否能够发送成功:
发送邮件到QQ或163邮箱测试效果
echo "content" | mail -s "title" xxx@163.com
163邮箱发送人显示的"root@xxx.com 注意:前面有个双引号不是单纯root
echo "content" | mail -s "title" xxx@foxmail.com
在foxmail邮箱里面收到的是:发件人:root <root@xxx.com>
注意:该配置只能是发送邮件,并不能接收邮件。
要用java调用shell命令发送邮件请看本人另外一篇博客:
Java执行shell脚本并返回结果两种方法的完整代码 - 流风,飘然的风 - 博客园
https://www.cnblogs.com/zdz8207/p/java-linux-shell.html
-------------
7.查看log,确认邮件发送状态:
Postfix邮件的log位置是:/var/log/maillog
发送成功的话,会返回250和OK,也可以去自己的邮件客户端查收。
mailq :会列出当前在postfix发送队列中的所有邮件
postsuper -d ALL:删除当前等待发送队列的所有邮件,包括发送失败的退信
查看进程:
# ps -ef | grep postfix
root 6104 1 0 01:45 ? 00:00:00 /usr/libexec/postfix/master -w
postfix 6106 6104 0 01:45 ? 00:00:00 qmgr -l -t unix -u
postfix 7946 6104 0 03:25 ? 00:00:00 pickup -l -t unix -u
root 8007 5166 0 03:27 pts/0 00:00:00 grep --color=auto postfix
============
CentOS中禁止掉邮件服务postfix:
查看状态
# service postfix status
systemctl status postfix
systemctl is-enabled postfix
禁止掉邮件服务postfix:
sudo systemctl stop postfix
sudo systemctl disable postfix
在操作之前和之后,可以查看状态:
systemctl status postfix
systemctl is-enabled postfix
================================
# systemctl is-enabled postfix
enabled
[root@alternative-unicorn-2 ~]# sudo systemctl stop postfix
[root@alternative-unicorn-2 ~]# sudo systemctl disable postfix
Removed symlink /etc/systemd/system/multi-user.target.wants/postfix.service.
[root@alternative-unicorn-2 ~]# systemctl is-enabled postfix
disabled
[root@alternative-unicorn-2 ~]# systemctl status postfix
● postfix.service - Postfix Mail Transport Agent
Loaded: loaded (/usr/lib/systemd/system/postfix.service; disabled; vendor preset: disabled)
Active: inactive (dead)
大自然,飘然的风,QQ群: python技术交流群:453879716,人工智能深度学习群:251088643
golang技术交流群:316397059,vuejs技术交流群:458915921 囤币一族:621258209,有兴趣的可以加入
微信公众号: 心禅道(xinchandao)投资论道
来源:https://www.cnblogs.com/zdz8207/p/Linux-postfix-sendmail.html |


 發表於 2019-7-28 03:45:00