1、SDK接入贝宝支付v1接口
注:底下有sdk的文档说明,如是代码问题可直接参考底部官方sdk文档
安装SDK
composer require paypal/rest-api-sdk-php:*
生成支付链接
class Paypal
{
protected $apiContext;
protected $amount;
protected $orderId;
public function __construct()
{
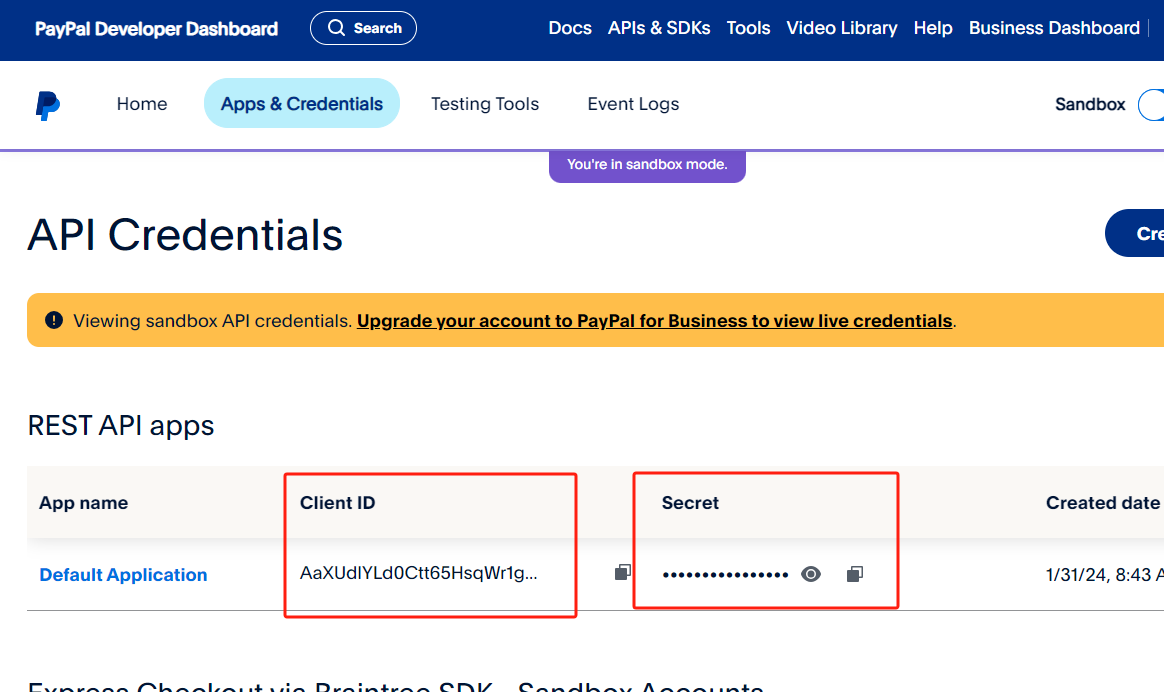
// CLIENT_ID、SECRET_KEY从Apps & Credentials->API Credentials->REST API apps列表中获取,参考图01
$this->apiContext = new ApiContext(
new OAuthTokenCredential(
"CLIENT_ID",
"SECRET_KEY"
)
);
$this->apiContext->setConfig(
[
'mode' => 'sandbox', //sandbox沙箱 或 'live'生产环境,根据你的环境设置
'log.LogEnabled' => true,
'log.FileName' => LOG_PATH . 'pay/paypal.log',
'log.LogLevel' => 'DEBUG'
]
);
}
/**
* 设置金额
* @param string $amount
* @return $this
*/
public function setAmount(string $amount): Paypal
{
$this->amount = $amount;
return $this;
}
/**
* 设置订单号
* @param string $orderId
* @return $this
*/
public function setOrderId(string $orderId): Paypal
{
$this->orderId = $orderId;
return $this;
}
/**
* 拉起支付
* @return string|null
* @throws Exception
*/
public function pay()
{
// 设置付款金额
$payment = new Payment();
$payment->setIntent("sale");
// 设置payer信息
$payer = new Payer();
$payer->setPaymentMethod('paypal');
$payment->setPayer($payer);
// 设置付款金额
$amount = new Amount();
$amount->setTotal($this->amount);
$amount->setCurrency('USD');
// 创建交易
$transaction = new Transaction();
$transaction->setAmount($amount);
$transaction->setCustom($this->orderId);
// 将交易添加到付款
$payment->addTransaction($transaction);
// 设置重定向 URL
$redirectUrls = new RedirectUrls();
$redirectUrls->setReturnUrl("支付成功跳转链接")
->setCancelUrl("支付失败或取消支付跳转链接");
$payment->setRedirectUrls($redirectUrls);
// 创建付款并获取批准 URL
try {
$payment->create($this->apiContext);
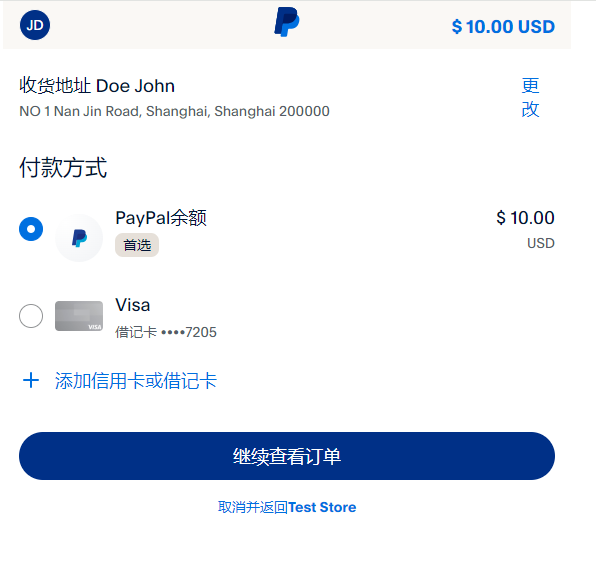
// 获取支付链接,直接做跳转就行了 跳转效果参考图02
return $payment->getApprovalLink();
} catch (\PayPalConnectionException $e) {
throw new Exception($e->getMessage());
}
}
}
图01
图02(注:测试支付时,在沙箱模式下用沙箱个人账号登录就可以支付,企业账号那是收款账号)
选择支付方式,点击继续查看订单就能跳转到支付成功的地方了
WebHook
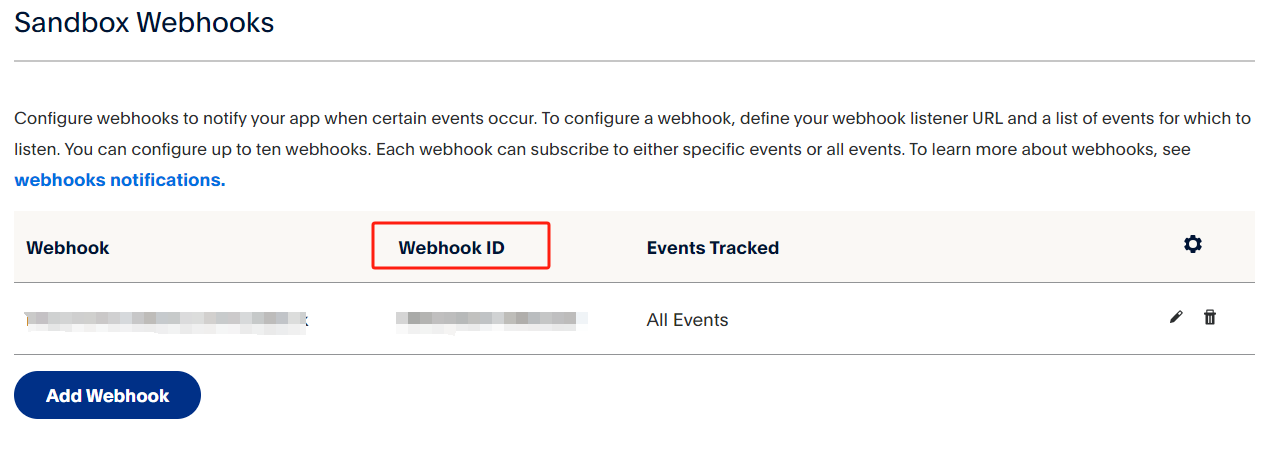
从参考图01中的Default Application点击进去,在最底部有个Add WebHook
添加你的Webhook Url 然后选择Event types,
选择事件Event types的时候碰到一些坑。
1、支付成功之后 设定的Webhook Url没有接收到Webhook,网站找了好些事件都没收到,干脆选择了ALL Events所有事件,就有收到Webhook的消息。
2、设置webhook成功之后,可以使用paypal上的Webhooks simulator,模拟Webhooks请求来确认设定的webhook url是否能被paypal调用。(需要注意的是,这个只是用来测试链接是都可用,不能用来做webhook的回调验证)
设定成功之后,Webhook ID要用来做webhook通知的验证
public function completed()
{
$requestBody = file_get_contents('php://input');
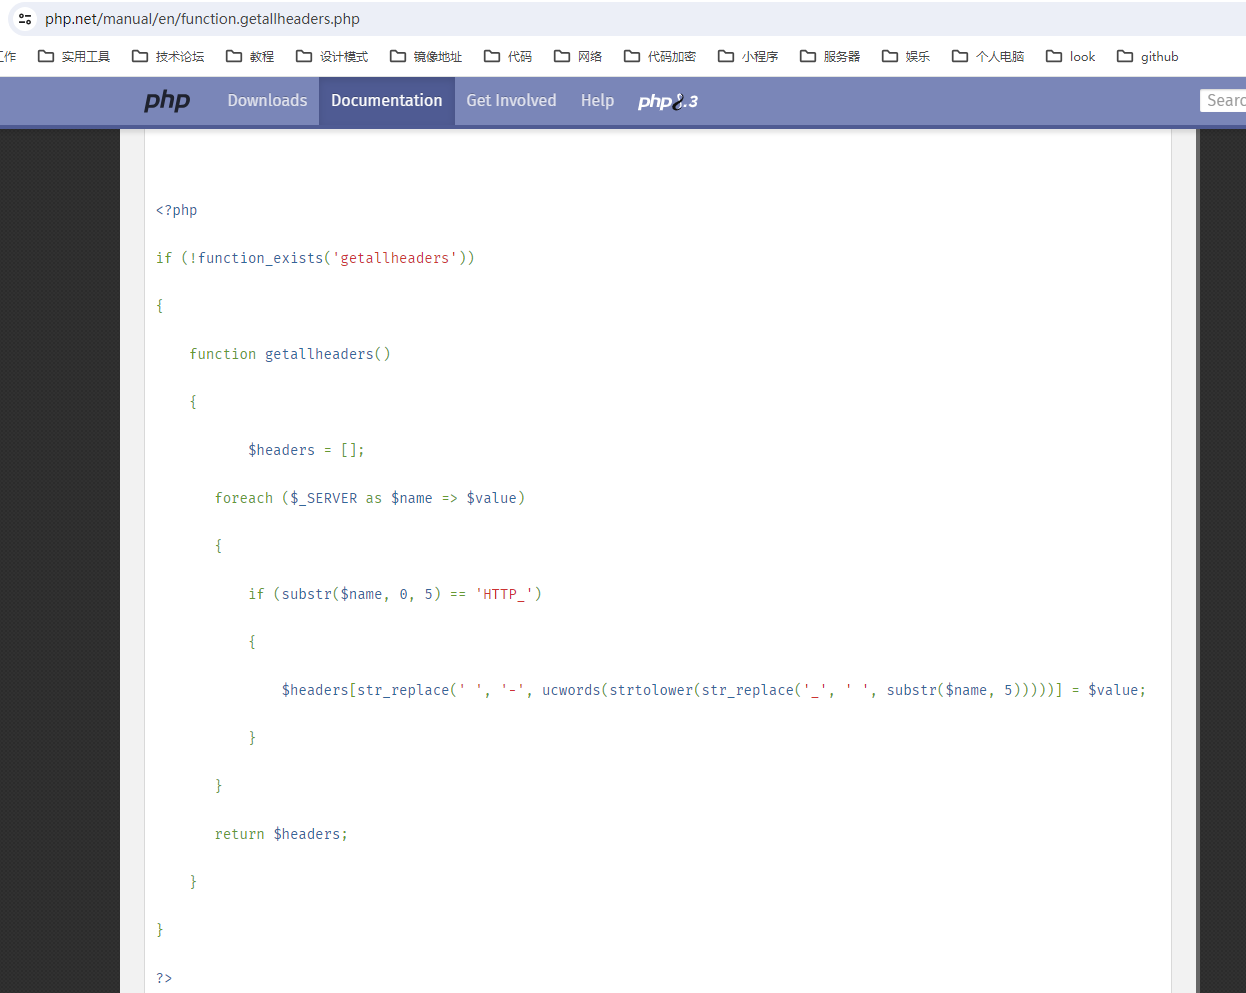
// getallheaders() 并非 PHP 标准库中的内置函数。这个函数通常是由 Apache 或 Nginx 提供的服务器软件自带的,用于获取 HTTP 请求的所有报头信息
// 可以参考 https://php.net/manual/en/function.getallheaders.php 参考图03自己写一个
$headers = getallheaders();
$headers = array_change_key_case($headers, CASE_UPPER);
$signatureVerification = new VerifyWebhookSignature();
$signatureVerification->setAuthAlgo($headers['PAYPAL-AUTH-ALGO']);
$signatureVerification->setTransmissionId($headers['PAYPAL-TRANSMISSION-ID']);
$signatureVerification->setCertUrl($headers['PAYPAL-CERT-URL']);
$signatureVerification->setWebhookId("7NR07992TT6909325"); // 此处填写Webhook id 参考上图
$signatureVerification->setTransmissionSig($headers['PAYPAL-TRANSMISSION-SIG']);
$signatureVerification->setTransmissionTime($headers['PAYPAL-TRANSMISSION-TIME']);
$signatureVerification->setRequestBody($requestBody);
$request = clone $signatureVerification;
try {
$output = $signatureVerification->post($this->apiContext);
} catch (\Exception $ex) {
log_message('验证webhook失败' . $request, 'log', LOG_PATH . 'pay/notify/paypal/');
http_response_code(400);
exit(1);
}
$checkArray = json_decode($output);
if ($checkArray['verification_status'] !== "SUCCESS") {
log_message('验证失败' . $output, 'log', LOG_PATH . 'pay/notify/paypal/');
http_response_code(400);
exit(1);
}
$body = json_decode($requestBody, true);
$event = $body['event_type'];
// 事件验证
if ($event != 'PAYMENTS.PAYMENT.CREATED') {
exit(1);
}
// todo 获取自定义订单号 从$requestBody中获取就行了,底部有附上webhook post过来的数据
// 此处需要调用execute函数否则不会扣款
// 获取payment_id
$paymentId = $body['resource']['id'] ?? "";
// 获取payer_id
$payer_id = $body['resource']['payer']['payer_info']['payer_id'] ?? "";
$payment = Payment::get($paymentId, $this->apiContext);
$execution = new PaymentExecution();
$execution->setPayerId($payerId);
// todo 当前步骤应放在支付成功页面用户确认可以扣款的时候执行,此处通知execute可以扣款
$payment->execute($execution, $this->apiContext);
http_response_code(200);
}
图03
附上sdk代码说明:
第一次调用:https://github.com/paypal/PayPal-PHP-SDK/wiki/Making-First-Call
webhook验证:https://github.com/paypal/PayPal-PHP-SDK/blob/master/sample/notifications/ValidateWebhookEvent.php
 1 {
 2     "id": "WH-xxxxx29646",
 3     "event_version": "1.0",
 4     "create_time": "2024-03-01T06:05:05.071Z",
 5     "resource_type": "payment",
 6     "event_type": "PAYMENTS.PAYMENT.CREATED",
 7     "summary": "Checkout payment is created and approved by buyer",
 8     "resource": {
 9         "update_time": "2024-03-01T06:05:05Z",
10         "create_time": "2024-03-01T06:04:17Z",
11         "redirect_urls": {
12             "return_url": "不给你看/success?order_id=xxxx17092730559494713269&paymentId=PAYID-MXQW7YQ1WK07543WU5660207",
13             "cancel_url": "不给你看/cancel?order_id=xxxx17092730559494713269"
14         },
15         "links": [{
16             "href": "https://api.sandbox.paypal.com/v1/payments/payment/PAYID-MXQW7YQ1WK07543WU5660207",
17             "rel": "self",
18             "method": "GET"
19         }, {
20             "href": "https://api.sandbox.paypal.com/v1/payments/payment/PAYID-MXQW7YQ1WK07543WU5660207/execute",
21             "rel": "execute",
22             "method": "POST"
23         }, {
24             "href": "https://www.sandbox.paypal.com/cgi-bin/webscr?cmd=_express-checkout&token=EC-88T51633HV219313S",
25             "rel": "approval_url",
26             "method": "REDIRECT"
27         }],
28         "id": "PAYID-MXQW7YQ1WKX07543WU5660207",
29         "state": "created",
30         "transactions": [{
31             "amount": {
32                 "total": "10.00",
33                 "currency": "USD"
34             },
35             "payee": {
36                 "merchant_id": "56LKGLM7XKYZS",
37                 "email": "sb-pst2f29464466@business.example.com"
38             },
39             "custom": "xxxx17092730559494713269",
40             "item_list": {
41                 "shipping_address": {
42                     "recipient_name": "Doe John",
43                     "line1": "NO 1 Nan Jin Road",
44                     "city": "Shanghai",
45                     "state": "Shanghai",
46                     "postal_code": "200000",
47                     "country_code": "C2"
48                 }
49             },
50             "related_resources": []
51         }],
52         "intent": "sale",
53         "payer": {
54             "payment_method": "paypal",
55             "status": "VERIFIED",
56             "payer_info": {
57                 "email": "sb-bmgd529469552@personal.example.com",
58                 "first_name": "John",
59                 "last_name": "Doe",
60                 "payer_id": "3X3PG26EMGJUXA",
61                 "shipping_address": {
62                     "recipient_name": "Doe John",
63                     "line1": "NO 1 Nan Jin Road",
64                     "city": "Shanghai",
65                     "state": "Shanghai",
66                     "postal_code": "200000",
67                     "country_code": "C2"
68                 },
69                 "country_code": "C2"
70             }
71         },
72         "cart": "88T51633HV219313S"
73     },
74     "links": [{
75         "href": "https://api.sandbox.paypal.com/v1/notifications/webhooks-events/WH-9X625867WT536171R-0TU00941FP4129646",
76         "rel": "self",
77         "method": "GET"
78     }, {
79         "href": "https://api.sandbox.paypal.com/v1/notifications/webhooks-events/WH-9X625867WT536171R-0TU00941FP4129646/resend",
80         "rel": "resend",
81         "method": "POST"
82     }]
83 }
2、不用SDK接入API v2接口
《官方接口文档地址》
注:原先以为用sdk会比较快也没有仔细的查看下文档,后来看了文档之后觉得直接接入接口还比较快,
还有一个是我觉得webhook会有延时,没有很实时。写的比较仓促,对你有帮助的话记得一键三连哈!!!
授权
我用用到的接口授权可以使用 <Access-Token> 也可以使用 <client_id:secret> 看你的需求去使用,主要看接口支不支持,看有没有必要省去获取<Access-Token>这一步
1、获取Access-Token
 1 const PAYPAL_API_TOKEN = 'paypal:token';
 2 protected $api;
 3
 4 public function __construct(){
 5         // api地址
 6         // 正式:https://api-m.paypal.com
 7         // 测试:https://api-m.sandbox.paypal.com
 8         $this->api = "https://api-m.sandbox.paypal.com";
 9 }
10 /**
11 * 获取token,一般返回来的access token有效时是9个小时
12 **/
13 public function getToken()
14     {
15         try {
16             // 获取缓存中是否有存在
17             $redis = Cache::store('redis');
18             $tokens = $redis->get(self::PAYPAL_API_TOKEN);
19             if ($tokens != null) {
20                // 有存在直接返回 access_token
21                 $array = json_decode($tokens, true);
22                 return resultArray(1, 'SUCCESS', [
23                     'access_token' => $array['access_token']
24                 ]);
25             }
26             // 使用测试pay
27             $clientId = '你的clientId';
28             $clientSecret = '你的secret';
29             // 对凭证base64编码
30             $credentials = base64_encode($clientId . ':' . $clientSecret);
31             $url =  $this->api . '/v1/oauth2/token';
32
33             $ch = curl_init();
34             curl_setopt($ch, CURLOPT_URL, $url);
35             curl_setopt($ch, CURLOPT_RETURNTRANSFER, 1);
36             curl_setopt($ch, CURLOPT_POST, 1);
37             curl_setopt($ch, CURLOPT_POSTFIELDS, 'grant_type=client_credentials');
38             curl_setopt($ch, CURLOPT_HTTPHEADER, array(
39                 'Content-Type: application/x-www-form-urlencoded',
40                 'Authorization: Basic ' . $credentials
41             ));
42
43
44             $result = curl_exec($ch);
45             if (curl_errno($ch)) {
46                 return resultArray(0, curl_error($ch));
47             }
48             curl_close($ch);
49             // 获取成功写入缓存
50             $array = json_decode($result, true);
51             $flag = $redis->set(self::PAYPAL_API_TOKEN, $result, $array['expires_in']);
52             if ($flag) {
53                 return resultArray(1, 'SUCCESS', [
54                     'access_token' => $array['access_token']
55                 ]);
56             }
57         } catch (\Exception $e) {
58             return resultArray(0, curl_error($ch));
59         }
60         return resultArray(0, '获取token失败');
61     }
2、封装CURL请求(包含<Access-Token> OR <client_id:secret>)
 1     /**
 2      * curl 请求 todo ①注释是access-token方式 ②是base64加密凭证
 3      * @param string $url
 4      * @param array $data
 5      * @param string $method
 6      * @return array
 7      */
 8     public function curl(string $url, array $data = [], string $method = 'GET'): array
 9     {
10         try {
11             $payload = empty($data) ? '' : json_encode($data);
12
13             /*
14              *  todo ① Access-Token方式,我的是放缓存,需要从缓存获取,缓存没有话会重新去请求拉取
15             $tokens = $this->getToken();
16             if ($tokens['code'] != 1) {
17                 return resultArray(0, $tokens['msg']);
18             }
19             $token = $tokens['data']['access_token'];
20             */
21
22             // todo ② 凭证编码
23             $token = base64_encode("你的client" . ':' . "你的secret");
24
25             $ch = curl_init();
26             curl_setopt($ch, CURLOPT_URL, $url);
27             // 将凭证放入请求头
28             curl_setopt($ch, CURLOPT_HTTPHEADER, array(
29                 'Content-Type: application/json',
30                 /* todo ①  Access-Token方式请求头
31                 'Authorization: Bearer ' . $token
32                 */
33                 // todo ② 直接使用base64加密凭证
34                 'Authorization: Basic ' . $token
35             ));
36             curl_setopt($ch, CURLOPT_RETURNTRANSFER, 1);
37             if ($method === 'POST') {
38                 curl_setopt($ch, CURLOPT_POST, true);
39                 curl_setopt($ch, CURLOPT_POSTFIELDS, $payload);
40             } elseif ($method === 'GET') {
41                 curl_setopt($ch, CURLOPT_HTTPGET, true);
42             }
43
44             $result = curl_exec($ch);
45             if (curl_errno($ch)) {
46                 return resultArray(0, curl_error($ch));
47             }
48
49             $data = json_decode($result, true);
50             $httpStatusCode = curl_getinfo($ch, CURLINFO_HTTP_CODE);
51             if ($httpStatusCode == 422) {
52                 $message = $data['message'] ?? "";
53                 return resultArray(0, 'HTTP 422 Unprocessable entity ERROR:' . $message);
54             } else if ($httpStatusCode == 504) {
55                 return resultArray(0, 'HTTP 504 Gateway Timeout');
56             }
57
58             curl_close($ch);
59             return resultArray(1, '', $data);
60         } catch (\Exception $e) {
61             return resultArray(0, $e->getMessage());
62         }
63     }
创建订单
public function create()
    {
        // OrderId是我的自定义订单号
        $successUrl = 'http://{支付成功跳转地址}?OrderId=' . $inserData['order_id'];
        $cancelUrl = 'http://{支付失败跳转地址}?OrderId=' . $inserData['order_id'];

        // 创建订单
        $url = $this->api . "/v2/checkout/orders";
        $data = array(
            'intent' => 'CAPTURE',
            'purchase_units' => [
                [
                    'reference_id' => "{你的自定义单号}",
                    'description' => "{订单描述}",
                    'amount' => [
                       // 货币缩写美元
                        'currency_code' => 'USD',
                        // 金额支持小数后两位
                        'value' => 0.01
                    ]
                ]
            ],
            'application_context' => [
                'shipping_preference' => 'NO_SHIPPING',
                'return_url' => $successUrl,
                'cancel_url' => $cancelUrl,
            ]
        );
        // 调用上面封装的curl
        $result = $this->curl($url, $data, 'POST');
        if ($result['code'] == 1) {

            // 下单成功之后直接跳转到支付链接(links数组中的第二个是支付页面的链接)
            $links = $result['data']['links'][1]['href'];
            header("Location: {$links}");
            exit(0);
        }
    }
捕获订单付款
用户支付成功之后会跳转到你定义的支付成功页面,你可以获取token然后请求capture接口来完成订单
 public function success()
 {

      $token = request()->get('token');
      $url = $this->api . "/v2/checkout/orders/{$token}/capture";
      $result = $this->curl($url, [], 'POST');
        // todo 此处可以根据捕获的订单信息,做订单验证、完结等业务逻辑
 }
来源:https://www.cnblogs.com/chenjiangbin/p/18047103 |


 發表於 2024-3-1 15:39:00