|
---恢复内容开始---
实现原理
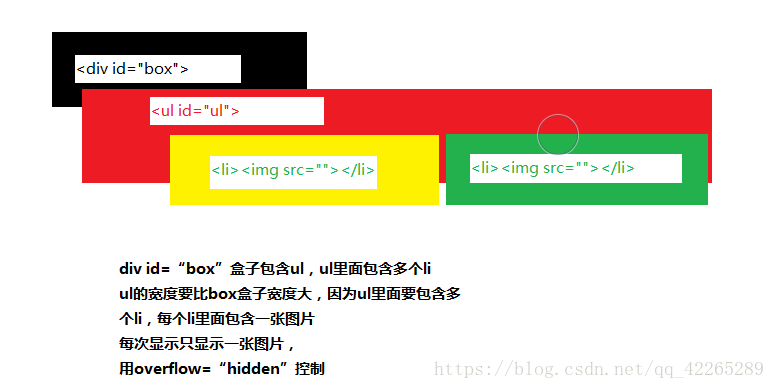
通过自定义的animate函数来改变元素的left值让图片呈现左右滚动的效果
HTML:
 1 <!DOCTYPE html>
 2 <html>
 3 <head>
 4     <meta charset="utf-8" />
 5     <link rel="stylesheet" type="text/css" href="StyleSheet.css">
 6     <title></title>
 7 </head>
 8 <body>
 9     <div id="scroll" class="scroll">
10         <div id="box" class="box">
11             <ul id="ul" style="left:-950px;">
12                 <li><img src="images/top_banner_bw01.jpg" width="950" height="438"></li>
13                 <li><img src="images/top_banner_bw02.jpg" width="950" height="438"></li>
14                 <li><img src="images/top_banner_bw03.jpg" width="950" height="438"></li>
15                 <li><img src="images/top_banner_bw04.jpg" width="950" height="438"></li>
16                 <li><img src="images/top_banner_bw05.jpg" width="950" height="438"></li>
17             </ul>
18             <ol id="olnavi"></ol>
19         </div>
20         <div id="last"></div>
21         <div id="next"></div>
22     </div>
23     <script src="a.js"></script>
24 </body>
25 </html>
CSS:
 1 body, div, p,
 2 h1, h2, h3, h4, h5, h6,
 3 dl, dt, dd, ul, ol, li,
 4 table, caption, th, td,
 5 form, fieldset, input, textarea, select,
 6 pre, address, blockquote,
 7 embed, object {
 8     margin: 0px;
 9     padding: 0px;
10 }
11
12 ul, ol {
13     list-style:none;
14 }
15
16 img {
17     vertical-align: top;
18 }
19
20 .scroll {
21     width: 950px;
22     height: 438px;
23     margin: auto;
24     overflow: hidden;
25     position: relative;
26 }
27
28 .box {
29     width: 950px;
30     height: 438px;
31     overflow: hidden;
32     position: relative;
33 }
34
35 .box ul{
36     width: 700%;
37     position: absolute;
38     left: 0;
39     top: 0;
40     padding:0px;
41     margin:0px;
42 }
43
44 .box ul li{
45     float: left;
46 }
47
48 .scroll ol {
49     position: absolute;
50     right: 365px;
51     bottom: 5px;
52 }
53
54 .scroll ol li {
55     float: left;
56     width: 20px;
57     height: 20px;
58     border-radius: 50%;
59     background: #000;
60     margin-left: 10px;
61     cursor: pointer;
62     opacity: 0.5;
63 }
64
65 .scroll ol li.current {
66     background-color: #000099;
67     opacity: 0.8;
68 }
69
70 #last {
71     position: absolute;
72     bottom: 179px;
73     width: 80px;
74     height: 80px;
75     cursor: pointer;
76 }
77
78 #next {
79     position: absolute;
80     bottom: 179px;
81     right: 0px;
82     width: 80px;
83     height: 80px;
84     cursor: pointer;
85 }
JavaScript:
  1 //1.先获取html中的元素
  2 var scroll = document.getElementById("scroll");
  3 var ul = document.getElementById("ul");
  4 var ulLis = ul.children;
  5 var liWidth = ul.children[0].offsetWidth;
  6 //2.再此之前,我们要明白,小圆点并不是写死的,它是根据ul li中的图片张数来决定的 。
  7 var ol = document.getElementById("olnavi");
  8 for (var i = 0; i < ulLis.length - 2; i++) {
  9     var li = document.createElement("li");
 10     li.id = (i + 1);  //id用于后面为li添加事件
 11     ol.appendChild(li);
 12
 13 }
 14 ol.children[0].className = "current" //将第一个小圆点设置为触发状态
 15 //3.要实现无缝滚动 就需要多两张图片才行 ,即克隆第一张图片,放到最后一张的后面,克隆最后一张,放到第一张的前面。
 16 var num = ulLis.length - 1;
 17 ul.appendChild(ul.children[0].cloneNode(true));
 18 ul.insertBefore(ul.children[num].cloneNode(true), ul.firstChild);
 19 //4.接下来为左右箭头添加事件,鼠标放到箭头上会变色
 20 var last = document.getElementById("last");
 21 last.style.background = "url(./img/left.png)";
 22 last.style.width = "64px";
 23
 24 last.addEventListener("mouseenter", function () {
 25     last.style.background = "url(./img/newleft.png)";
 26 }, false);
 27
 28 last.addEventListener("mouseleave", function () {
 29     last.style.background = "url(./img/left.png)";
 30 }, false);
 31
 32 var next = document.getElementById("next");
 33 next.style.background = "url(./img/right.png)";
 34 next.style.width = "64px";
 35
 36 next.addEventListener("mouseenter", function () {
 37     next.style.background = "url(./img/newright.png)";
 38 }, false);
 39
 40 next.addEventListener("mouseleave", function () {
 41     next.style.background = "url(./img/right.png)";
 42 }, false);
 43 // 5.我们接着用js做动画 动画部分包括:
 44 // ①.鼠标点击第几个小圆点,就要展示第几张图片,并且小圆点的颜色也发生变化.
 45 // ②. 鼠标点击左右箭头,图片向左右移动一张
 46 // ③图片自动轮播,(这需要一个定时器)
 47 // ④.鼠标放在图片上,图片停止自动播放(这需要清除定时器)
 48 // ⑤.鼠标离开图片,图片继续自动轮播 (重新开始定时器)
 49 // 这里我们封装了一个animate()动画函数
 50 function animate(obj, target) {  //obj为需要移动的元素,在本文中为ul,target为需要移动到的位置
 51     var speed = obj.offsetLeft < target ? 10 : -10;  //判断速度向左还是向右
 52     obj.timer = setInterval(function () {  //计时器每隔一定时间移动一次
 53         var result = target - obj.offsetLeft;  //剩余需要移动的距离
 54         obj.style.left = obj.offsetLeft + speed + "px";  //改变元素的left来实现移动
 55         if (Math.abs(result) <= Math.abs(speed)) {  //当需要移动的距离小于速度时
 56             clearInterval(obj.timer);   //清除计时器
 57             obj.style.left = target + "px";  //直接移动到需要移动的位置
 58             flag = true;  //将flag置为true,使点击事件能再次触发
 59         }
 60     }, 1);
 61 }
 62 //6.接下来把动画函数赋给左右箭头
 63 var flag = true;  //用于判断上一个事件是否执行完毕,如果没有执行完毕禁止再次触发事件
 64 var index = 1;  //是第几个小圆点
 65 var lastclick = function () {
 66     if (flag) {
 67         flag = false;  //进入事件将flag置为false
 68         console.log(flag);
 69         if (index === 1) {  //判断是否为第一张
 70             index = 6;
 71             ul.style.left = "-5994px";  //当移动到第一张时,再向右移前会替换到最后一张后面的第一张,然后再向右移动。
 72             animate(ul, ul.offsetLeft + liWidth); //动画函数一次向有移动一个图片长度的距离
 73         }
 74         else {
 75             animate(ul, ul.offsetLeft + liWidth);
 76         }
 77         index -= 1; //移动小圆点计数器
 78         btnShow(index);  //给新的小圆点高亮,取消上一个小圆点的高亮
 79     }
 80 }
 81 last.addEventListener("click", lastclick, false);  //将函数赋给点击事件
 82
 83 var nextclick = function () {  //向左移与向右移类似
 84     if (flag) {
 85         flag = false;
 86         if (index === 5) {
 87             index = 0;
 88             ul.style.left = "0px";
 89             animate(ul, ul.offsetLeft - liWidth);
 90         }
 91         else {
 92             animate(ul, ul.offsetLeft - liWidth);
 93         }
 94         index += 1;
 95         btnShow(index);
 96     }
 97 }
 98 next.addEventListener("click",nextclick, false);
 99
100 function btnShow(cur_index) {
101     for (var i = 0; i < ol.children.length; i++) {
102         ol.children.className = ' '; //取消全部li的类
103     }
104     ol.children[cur_index - 1].className = "current";  //给新的小圆点加上类
105 }
106 //7.再加上一个计时器,每隔一段时间就会触发一次下一张的效果,来实现轮播
107 var timer;
108 function play() {
109     timer = setInterval(nextclick, 3000)
110 }
111
112 scroll.addEventListener("load", play(), false);  //整个div全部加载完毕后开始
113
114 scroll.addEventListener("mouseenter", function () { //鼠标移入图片是清除计时器
115     clearInterval(timer);
116 }, false);
117
118 scroll.addEventListener("mouseleave", function () {  //鼠标移出图片时再次启动计时器
119     play();
120 }, false);
121
122 //8.最后给小圆点加上事件,点第几个轮播到第几张
123 //小圆点的点击事件
124 var olliclick = function () {
125     if (flag) {
126         flag = false;
127         var cur_li = document.getElementsByClassName("current");
128         var lastid = cur_li[0].id;  //当前的小圆点是第几个
129         var distance = this.id - lastid;  //计算当前小圆点与点击的小圆点的距离(分正负)
130         if (distance == 0) {
131             flag = true;
132         }
133         else {
134             animate_ol(ul, distance);
135         }
136     }
137 }
138
139 //给所有的小圆点添加上点击事件
140 var ollitimer = 1
141 var lis = ol.getElementsByTagName('li');
142 for (ollitimer; ollitimer < lis.length+1; ollitimer++) {
143     var olli = document.getElementById(ollitimer);
144     olli.addEventListener("click", olliclick, false);
145 }
146
147 function animate_ol(obj, value) {  //小圆点动画函数
148     if (value > 0) {  //判断移动方向
149         var speed = -20*value; //使动画时间一致
150     }
151     if (value < 0) {
152         var speed = -20*value;
153     }
154     var lastleft = obj.offsetLeft;
155     obj.timer = setInterval(function () {
156         var distance = Math.abs(value * liWidth) - Math.abs(obj.offsetLeft - lastleft);
157         //剩余需要移动的距离
158         if (distance < Math.abs(speed)) {
159             clearInterval(obj.timer);
160             if (value > 0) {
161                 obj.style.left = obj.offsetLeft - distance + "px";
162                 flag = true;
163             }
164             if (value < 0) {
165                 obj.style.left = obj.offsetLeft + distance + "px";
166                 flag = true;
167             }
168         }
169         else {
170             obj.style.left = obj.offsetLeft + speed + "px";
171         }
172     }, 1);
173     index = index + value;
174     btnShow(index);
175 }
再对一下常见的鬼畜bug进行一下总结:
通过设置flag来防止多次点击造成的计时器冲突,在点击后将flag置为false,在动画函数结束时再置为true,这样只能在上一个点击事件动画结束后才会触发第二次。
内容:html+css
来源:https://www.cnblogs.com/mingdao/p/lunbo.html |



 發表於 2019-7-5 14:48:00