环境安装
- Android Studio安装版,解压版。需要配置jdk。
- Android Studio配置包含SDK manager.、AVD manager、Adb。(都包含在sdk中)
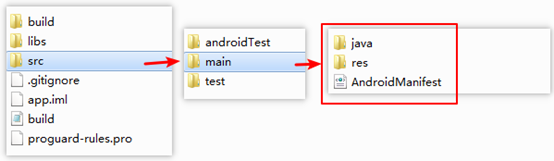
项目目录
新建项目后项目根目录如下。
AndroidManifest.xml
项目AndroidManifest.xml配置文件配置项目的主activity,需要获取的权限等一些项目配置信息。
java
项目java目录下配置活动的后台代码。
res
项目res/layout目录下有activity的前端布局文件。
项目res/values目录下包含一些公用的配置。
- Drawable可以放置一些图片,但是不支持缩放。
- colors.xml配置公共颜色;
- dimens.xml配置组件大小等设置;
- strings.xml配置公用字符串;
- styles.xml配置公用样式。
Activity学习
dimens.xml
配置组件通用大小以及组件字体大小等。
string.xml
配置通用字符串。
activity.xml
LinearLayout两种LinearLayout控制整个页面的布局(横向和纵向)。
match_parent代表高度/宽度匹配父级。
wrap_content代表高度/宽度匹配内容。
text引用String.xml中的内容。Text中的内容可以在activity中写死也可以引用string.xml中配置,也可以在代码中设置。
gravity代表对齐方式。
layout_weight 代表控件占剩余控件的比例。
<TextView
    android:layout_width="match_parent"
    android:layout_height="wrap_content"
    android:text="@string/txt_val"
    android:id="@+id/txtCalc"
    android:textSize="28dp"
    android:gravity="right" />

<Button
    android:id="@+id/buttonequal"
    android:layout_width="wrap_content"
    android:layout_height="@dimen/btn_size"
    android:textSize="@dimen/btn_fontsize"
    android:layout_weight="1"
    android:text="=" />
Java代码控制组件
/*给文本框设置默认值*/
final TextView txtCalc = (TextView)super.findViewById(R.id.txtCalc);
txtCalc.setText("0.0");

Button button0 = (Button)super.findViewById(R.id.button0);
//定义OnClickListener变量
View.OnClickListener btnClickListener = new View.OnClickListener(){
    @Override
    public void onClick(View v) {  //View代表被点击的控件
        txtCalc.setText(((Button)v).getText() );
    }
};
button0.setOnClickListener(btnClickListener);
Intent
实现activity跳转
/*跳转到其他activity,参数一为本activity,参数二位要跳转到的activity的class*/
Intent intent = new Intent(MainActivity.this,JumpActivity.class);
//注意这里一定只能存入String的value,第二个activity才能用getStringExtra()
intent.putExtra("msg",editText.getText().toString());
startActivity(intent);

/*第二个activity获取intent传输的值*/
Intent intent = super.getIntent();
/*从intent的Extra中获取key为msg的字符串值*/
String msgVal = intent.getStringExtra("msg");
调用浏览器
Uri uri = Uri.parse("http://"+editText.getText());
Intent uri_intent = new Intent(Intent.ACTION_VIEW,uri);
startActivity(uri_intent);
调用电话
<!--电话权限-->
<uses-permission android:name="android.permission.CALL_PHONE"/>

/*调用电话*/
Uri teluri = Uri.parse("tel:"+editText.getText());
Intent tel_intent = new Intent(Intent.ACTION_DIAL);
tel_intent.setData(teluri);
startActivity(tel_intent);
手机硬件调用
adb_interface_usb_driver
调试手机用的usb驱动。一定要安装否则adb连接不上去。直接在设备管理器中双击黄色的感叹号,然后选择解压文件即可。
另外,红米note8 pro是可以在 开发者模式中 -> 默认USB配置 -> 选择USB网络共享,即可让电脑使用手机的流量(不经过FQ代理)。
AndroidManifest.xml
在这个文件中配置项目使用的权限,这里调用振动组件。
    <!--获取振动权限-->
    <uses-permission android:name="android.permission.VIBRATE"></uses-permission>
activitey.xml
在activity中,使用TextView、SeekBar,其中TextView的值随着SeekBar的改动而改动。
SeekBar要设置max值,也就是滑块的最大值。通过getProgress()方法获取SeekBar组件的值。
        <TextView
            android:id="@+id/txtView"
            android:layout_width="match_parent"
            android:layout_height="wrap_content"
            android:text="New Text"
            android:layout_weight="1" />
        <!--滑动组件-->
        <SeekBar
            android:id="@+id/seekBar0"
            android:layout_width="match_parent"
            android:layout_height="wrap_content"
            android:layout_weight="1"
            android:max="2000" />
MainActivity.java
//调用震动服务,Vibrator.class可以替换为Context.VIBRATOR_SERVICE
Vibrator vibrator = getSystemService(Vibrator.class);
vibrator.vibrate(1000); //振动一秒
如果这篇文章对你有用,可以关注本人微信公众号获取更多ヽ(^ω^)ノ ~
来源:https://www.cnblogs.com/aeolian/p/12040807.html |


 發表於 2019-12-15 16:51:00