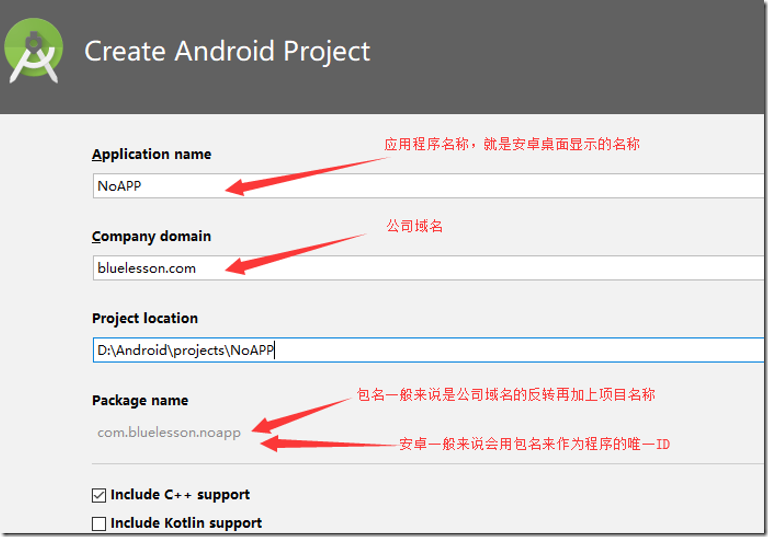
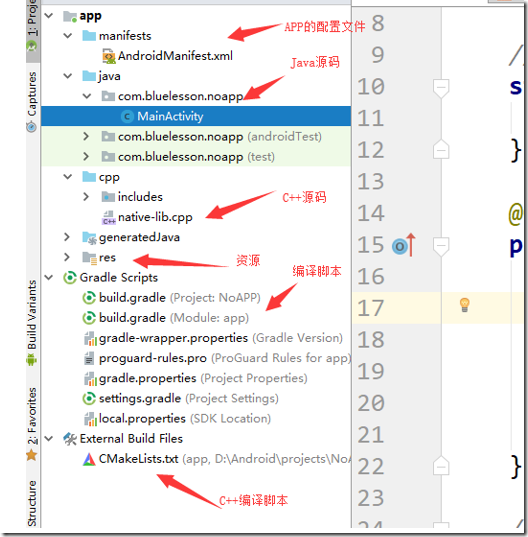
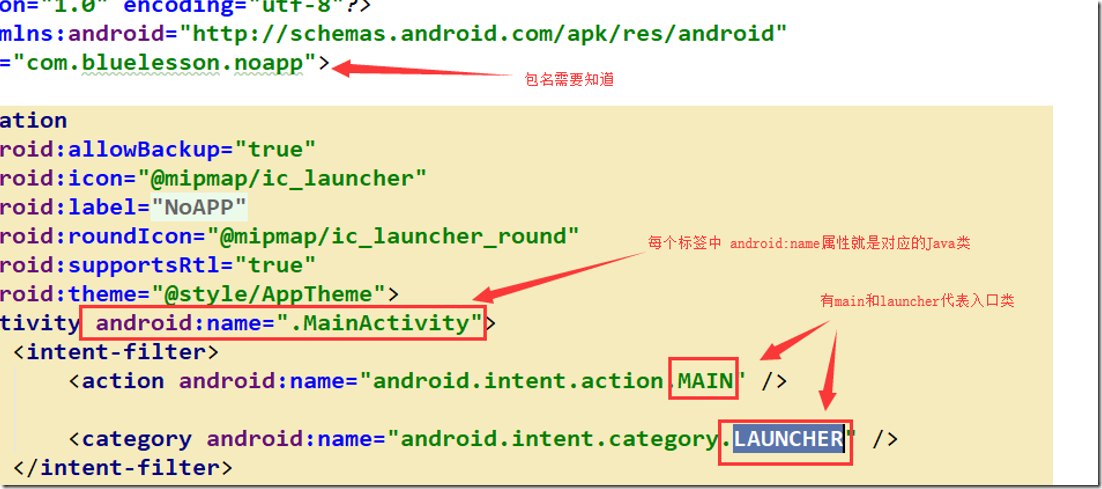
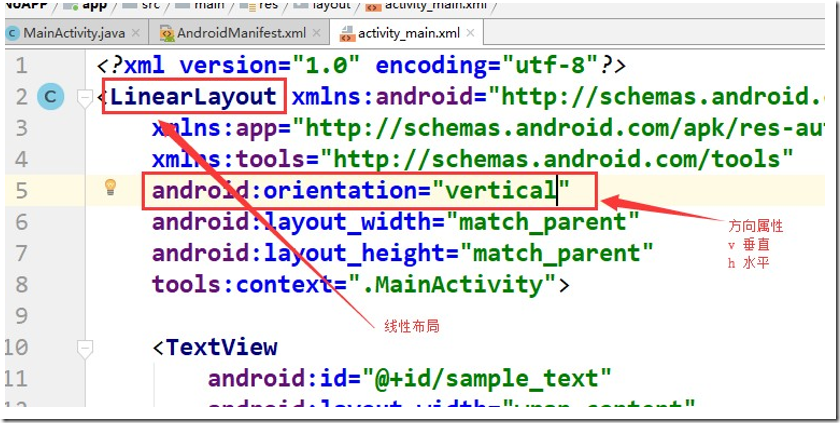
Android开发基础开发基础包括 ① Android开发环境搭建Android Studio的安装https://developer.android.google.cn/studio/ SDK的下载和配置两种方法, 方法1 拷贝别人的SDK文件夹中的所有内容,放在与AndroidStudio在同级目录方法2 根据Android Studio的向导去下载和安装 模拟器的安装与配置方法1 拷贝别人的SDK文件夹中的所有内容,放在与AndroidStudio在同级目录 方法2 在Android Studio中找到 AVD Manager,根据向导去下载和创建 方法3 使用第三方的模拟器,也选择android 4.4版本,比如夜神模拟器3.8(不要用最新的) 注意事项在下载安装完android studio和sdk之后,创建工程时还会下载gradle工具,用于编译构建 目录是:C:\Users\自己的用户名.gradle 如果创建工程还有问题,一般做一个小更新就可以。 ② Android HelloWorldAndroid HelloWorld 工程的创建,工程中每一部分的介绍创建工程界面 创建完项目之后,产生的文件 清单文件 ③ Android 界面开发知识无形组件:布局的定义与常用属性设置有形组件:按钮、文件控件、编辑文本、图片控件的定义与常用属性设置 指定ID:android:id="@+id/imageView" 指定宽度:android:layout_width="wrap_content" android:layout_width="match_parent" wrap_content 内容多大控件就多大,match_parent 匹配父窗口 指定高度:android:layout_height="wrap_content" 图片控件指定图片源:android:src="@mipmap/ic_launcher" 编辑控件指定提示文本:android:hint="请在此输入密码" 按钮控件指定显示文本:android:text="验证" 指定控件居中:android:layout_gravity="center" 按钮响应方法一: 设置按钮属性 添加完响应函数后。 在函数名上alt+enter实现具体函数内容 public void btnStart1(View view) {
// 启动一个新的activity
// 1. 创建Intent对象
Intent intent = new Intent();
// 2. 设置信息
intent.setClass(this,// 自己
Main2Activity.class); // 新启动的类的类型
//Main2Activity是新创建的活动界面
// 3. 启动activity
startActivity(intent);
//这句包括了三面的3句话的内容
//startActivity(new Intent(this,Main2Activity.class));
}方法二: 先在manifests的Androidmanifest.xml添加 <activity android:name=".Main2Activity">
<intent-filter>
<action android:name="com.bluelesson.action.hello15pb" />
<category android:name="android.intent.category.DEFAULT" />
</intent-filter>
</activity> action android:name="com.bluelesson.action.hello15pb" 动作的名字 category android:name="android.intent.category.DEFAULT" 设置成DEFAULT默认 然后调用动作。 public void btnStart2(View view) {
// 1. 创建Intent对象
Intent intent = new Intent();
// 2. 设置动作
intent.setAction("com.bluelesson.action.hello15pb");
// 3. 启动activity
startActivity(intent);
}打开服务 关闭服务 先新建一个服务类 用log.d做标签做标注方便观察。 package com.example.mybuttontest;
import android.app.Service;
import android.content.Intent;
import android.os.IBinder;
import android.util.Log;
public class MyService extends Service {
public MyService() {
}
@Override
public IBinder onBind(Intent intent) {
// TODO: Return the communication channel to the service.
throw new UnsupportedOperationException("Not yet implemented");
}
@Override
public void onCreate() {
super.onCreate();
Log.d("Andy", "onCreate: ");
}
@Override
public void onStart(Intent intent, int startId) {
super.onStart(intent, startId);
Log.d("Andy", "onStart: ");
}
@Override
public int onStartCommand(Intent intent, int flags, int startId) {
Log.d("Andy", "onStartCommand: ");
return super.onStartCommand(intent, flags, startId);
}
@Override
public void onDestroy() {
super.onDestroy();
Log.d("Andy", "onDestroy: ");
}
} 再调用它 <Button
android:id="@+id/btn3"
android:layout_width="wrap_content"
android:layout_height="wrap_content"
android:onClick="btnStart3"
android:text="启动一个服务" />
<Button
android:id="@+id/btn4"
android:layout_width="wrap_content"
android:layout_height="wrap_content"
android:onClick="btnStart4"
android:text="关闭服务" /> 代码中设置监听器匿名类直接new接口自动实现接口、内部类实现接口、外部类实现接口 ① 匿名类直接new接口自动实现接口 在MainActivity的重写oncreate函数内 // 设置按钮响应事件
// 方法1 : 匿名类对象
// 1. 获取按钮对象
Button button2 = findViewById(R.id.btn2);
// 2. 设置监听器
button2.setOnClickListener(new View.OnClickListener() {
//View.OnClickListener会报红,ALT+ENTER可以快速创建下面内容
@Override
public void onClick(View v) {
Toast toast = Toast.makeText(
MainActivity.this,// 只要是Context类型的this就行,activity肯定可以,因为其父类的父类。。。是Context
"按钮2",// 显示的内容
Toast.LENGTH_SHORT // 显示的时间 LENGTH_SHORT 2秒
);
toast.show();
}
});
② 内部类实现接口 // 内部类定义
public class MyOnClickListener implements View.OnClickListener {
@Override
public void onClick(View v) {
Toast toast = Toast.makeText(MainActivity.this,"按钮3",Toast.LENGTH_SHORT );
toast.show();
}
}
// 调用
// 获取按钮控件
Button button = findViewById(R.id.button);
// 设置响应监听器
button.setOnClickListener(new MyOnClickListener()); ③ 外部类实现接口 public class MainActivity extends AppCompatActivity implements
// 方法3: 外部类对象
// 1. 获取按钮对象
Button button4 = findViewById(R.id.btn4);
// 2. 设置监听器
button4.setOnClickListener(this);}
@Override
public void onClick(View v) {
Toast toast = Toast.makeText( this,"按钮4",Toast.LENGTH_SHORT);
toast.show();} 提示对话框Toast、Dialog的创建与使用 // 弹出信息,自动消失
Toast.makeText(this, // 界面指针
"显示", // 显示的内容
Toast.LENGTH_SHORT // 显示的时间 LENGTH_SHORT=2秒
).show();
// 弹出信息,点击消失
AlertDialog.Builder dlg = new AlertDialog.Builder(this);
dlg.setMessage("内容");
dlg.setTitle("标题");
dlg.show(); ④ Android 四大组件 Activity,BroadcastReceiver,Service,ContenProivder Activity的生命周期
程序运行起来执行:onCreate》onStart》onResume 当activity被覆盖:onPause》onStop 当重新显示时:onRestart》onStart》onResume 当关闭时:onPause》onStop》onDestroy 广播接收者的写法
IP拨号器创建广播接收者的子类指定拦截广播的权限(manifest.xml里面添加到包的下一句) <uses‐permission android:name="android.permission.PROCESS_OUTGOING_CALLS" /> 指定拦截广播的动作 <receiver
android:name=".MyReceiver"
android:enabled="true"
android:exported="true">
<intent‐filter>
<action
android:name="android.intent.action.NEW_OUTGOING_CALL" />
<category
android:name="android.intent.category.DEFAULT" />
</intent‐filter>
</receiver>
调用 package com.bluelesson.app34_1;
import android.content.BroadcastReceiver;
import android.content.Context;
import android.content.Intent;
// 广播接收器,作用是拦截广播,做一些需要做的事情
// 必备条件:
// 通过向导新建一个BroadcastReceiver的子类
// 1. 指定权限
// 2. 指定拦截的是哪个广播
// 3. 完成代码
public class MyReceiver extends BroadcastReceiver {
@Override
public void onReceive(Context context, Intent intent) {
// TODO: This method is called when the BroadcastReceiver is receiving
// an Intent broadcast.
// IP拨号器 写代码
// 1. 获取打电话的号码
String num = getResultData();
// 2. 修改电话号码
setResultData("123456"+num);
}
} 开启启动权限 <uses-permission android:name="android.permission.RECEIVE_BOOT_COMPLETED" /> 指定拦截广播的动作 <receiver
android:name=".MyReceiver2"
android:enabled="true"
android:exported="true">
<intent-filter>
<action android:name="android.intent.action.BOOT_COMPLETED" />
<category android:name="android.intent.category.DEFAULT" />
</intent-filter>
</receiver> 调用 public class MyReceiver2 extends BroadcastReceiver {
@Override
public void onReceive(Context context, Intent intent) {
// TODO: This method is called when the BroadcastReceiver is receiving
// an Intent broadcast.
Log.d("15pb-log", "开机启动");
// 启动activity
// 1. 创建Intent
Intent intent1 = new Intent();
// 2. 设置信息
intent1.setClass(context,Main2Activity.class);
intent1.setFlags(Intent.FLAG_ACTIVITY_NEW_TASK);// 需要设置标志创建activity栈
// 3. 启动acitivity
context.startActivity(intent1);
}
}
服务的生命周期启动时:onCreate》onStartCommand》onStart 退出时: onDestroy 程序入口 <!-- application标签中的android:name 可以指定一个类,这个类主要作用时全局初始化 -->
<!-- 这个类在安全领域中 主要是 用于写壳代码 -->
<application
android:name=".MyApp" MyApp类 package com.bluelesson.app34_2;
import android.app.Application;
import android.content.Context;
import android.util.Log;
public class MyApp extends Application {
// http://androidxref.com/
@Override
protected void attachBaseContext(Context base) {
super.attachBaseContext(base);
Log.d("15pb-log", "MyApp::attachBaseContext");
}
@Override
public void onCreate() {
super.onCreate();
Log.d("15pb-log", "MyApp::onCreate");
}
}
⑤ Android 多线程与消息机制Thread,Handler 线程中发消息代码:
// 创建消息对象
Message message = new Message();
message.what = 0x111;
message.obj = content;
// 发消息给主线程
handler.sendMessage(message);
外部handler创建网络编程-访问网站-下载图片权限 <uses-permission android:name="android.permission.INTERNET"></uses-permission> 消息分发 Handler mHandler = new Handler(){
@Override
public void handleMessage(Message msg) {
super.handleMessage(msg);
//判断对应的消息ID,获取消息内容,设置信息
if(msg.what == SET_TEXT){
TextView textView = findViewById(R.id.tv1);
textView.setText((String)msg.obj);
} else if(msg.what == GET_PIC){
ImageView imageView = findViewById(R.id.iv1);
imageView.setImageBitmap((Bitmap) msg.obj);
}
}
};
访问网站 public void onClick(View view) {
// 访问网络的一些注意事项
// 1. 访问网络需要权限
// 2. 访问网络需要在工作线程中操作
// 3. 工作线程中不能操作界面,需要发消息给主线程
// 访问百度
Thread thread = new Thread(){
@Override
public void run() {
super.run();
URL url = null;
try {
// 1. 创建url对象
url = new URL("http://www.baidu.com");
// 2. 打开连接
HttpURLConnection httpURLConnection = (HttpURLConnection) url.openConnection();
// 3. 设置信息
httpURLConnection.setConnectTimeout(2000);
httpURLConnection.setRequestMethod("GET");
// 4. 获取返回信息
// android.os.NetworkOnMainThreadException
int ret = httpURLConnection.getResponseCode();
if(ret == 200){
InputStream inputStream = httpURLConnection.getInputStream();
ByteArrayOutputStream byteArrayOutputStream = new ByteArrayOutputStream();
byte bytes[] = new byte[1024];
int nReadlen = -1;
while(true){
nReadlen = inputStream.read(bytes,0,1024);
if(nReadlen == -1) break;
byteArrayOutputStream.write(bytes,0,nReadlen);
}
byte bytes1[] = byteArrayOutputStream.toByteArray();
String s = new String(bytes1);
Message message = new Message();
message.what = SET_TEXT;
message.obj = s;
mHandler.sendMessage(message);
// 工作线程中不能有界面操作的
// TextView textView = MainActivity.this.findViewById(R.id.tv1);
// textView.setText(s);
Log.d("15pb-log", s);
}
} catch (MalformedURLException e) {
e.printStackTrace();
} catch (IOException e) {
e.printStackTrace();
}
}
};
thread.start();
}下载图片 public void onClick1(View view) {
Thread thread = new Thread(){
@Override
public void run() {
super.run();
URL url = null;
try {
// 1. 创建url对象
url = new URL("http://ws4.sinaimg.cn/large/00745YaMly1g76yel1cf6j30u01904qy.jpg");
// 2. 打开连接
HttpURLConnection httpURLConnection = (HttpURLConnection) url.openConnection();
// 3. 设置信息
httpURLConnection.setConnectTimeout(2000);
httpURLConnection.setRequestMethod("GET");
// 4. 获取返回信息
// android.os.NetworkOnMainThreadException
int ret = httpURLConnection.getResponseCode();
if(ret == 200){
InputStream inputStream = httpURLConnection.getInputStream();
ByteArrayOutputStream byteArrayOutputStream = new ByteArrayOutputStream();
byte bytes[] = new byte[1024];
int nReadlen = -1;
while(true){
nReadlen = inputStream.read(bytes,0,1024);
if(nReadlen == -1) break;
byteArrayOutputStream.write(bytes,0,nReadlen);
}
byte bytes1[] = byteArrayOutputStream.toByteArray();
// 将数据转为图片
Bitmap bitmap = BitmapFactory.decodeByteArray(bytes1,0,bytes1.length);
Message message = new Message();
message.what = GET_PIC;
message.obj = bitmap;
mHandler.sendMessage(message);
}
} catch (MalformedURLException e) {
e.printStackTrace();
} catch (IOException e) {
e.printStackTrace();
}
}
};
thread.start();
}
}网页要滑动屏幕的话,TextView放在activity_main.xml的ScrollView里面就可以 <ScrollView
android:layout_width="match_parent"
android:layout_height="wrap_content">
<TextView
android:text="显示内容"
android:id="@+id/tv1"
android:layout_width="match_parent"
android:layout_height="wrap_content" />
</ScrollView>
下载图片。放图片的位置直接用代码就行,注意id最好要重命名。 <ImageView
android:id="@+id/iv1"
android:layout_width="match_parent"
android:layout_height="wrap_content" />
来源:https://www.cnblogs.com/ltyandy/p/11564388.html |


 發表於 2019-9-21 20:00:00